How To Edit WooCommerce Shop Page with Elementor

Online shopping has become popular and almost a norm these days. Therefore, making an eCommerce store stand out from the competition is no longer a piece of cake. Although product quality and related services are crucial for an e-commerce shop’s success, it is equally important to pay special attention to the website’s shop pages. The shop page is the soul of every online store, so developers of WordPress development agencies pay attention to it. Moreover, a page shop is the main thing customers feel attracted towards. Thus, all your shop pages must look eye-catching.
A WooCommerce shop’s success is dependent on its shop pages. So, you need to customize or change your page shops so that your customers have a good time and your sales go through the roof.
To edit your WooCommerce shop page, you need to have the plugin called Elementor. Through Elementor, you can make your WooCommerce shop page fascinating. But how to do it? Keep reading
The WooCommerce shop page and Elementor are the two major things we will dig deep into in this article. First up, why do we need to edit the WooCommerce shop page?
As per WooCommerce, a shop page is a placeholder for products for the post-type archive. To simplify, a page shop is a page where you can display all your offerings.
What is a WooCommerce Shop Page?
A WooCommerce shop page is necessary for an online store as visitors and clients can interact with it. The appearance of WooCommerce determines the success of an online store. The arrangement of your products in a unique way, the attention to detail regarding product information, or how easy it is for buyers to find things easily are some of the indicators that impact buyer experience.
A luring and user-friendly online shop makes the shopping experience seamless and sets you apart from the crowd. It allows you to increase page impressions and lead conversions and enhance your brand’s reputation.
You will always find the basic WooCommerce shop page template attractive and functional. However, there will be some gaps that you need to fill. A custom WooCommerce shop page is what you need to show off your products in the best way.
This blog will discuss the effortless way to edit the WooCommerce shop page through Elementor.
Why Elementor for WooCommerce Shop Page?
Elementor is a renowned WordPress page builder with a drag and drop feature. With Elementor, you can develop your website with no proper coding knowledge.
Elementor is considered one of the top page builder tools for a customized WooCommerce shop page. as a sought-after WP page builder plugin with over 4 million installations, supported by WooCommerce.
Editing a shop page was once a time-consuming, complex, and costly activity. Website designers used to have just two options; one was coding theme PHP files, and the other was WooCommerce’s hooks. However, with the invention of Elementor, all you need is a drag-and-drop skill and a designing brain.
Moreover, Elementor also provides a bunch of helpful add-ons. The add-ons enable seamless website organization that meets your brand’s requirements. What makes Elementor unique is its visual format. It enables you to see your designed content to know whether it will give the optimal result or not.
Since you know the key features of using Elementor, let’s find out the steps to edit the WooCommerce shop page:
Five Easy Steps to Edit WooCommerce Shop Pages with Elementor
In this blog, we are focusing on editing the WooCommerce shop page with Elementor. But first, make sure you have the WooCommerce Elementor plugin installed and active on your WordPress site.With inactive WooCommerce, you can not access product templates with Elementor.
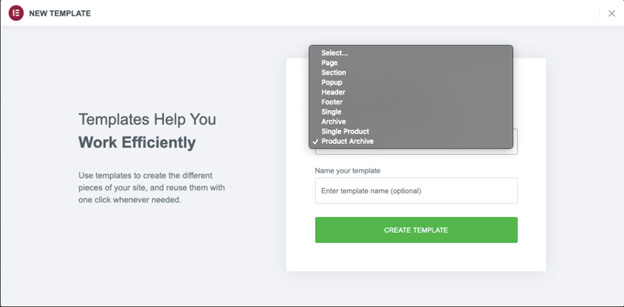
Step 1: Create a Product Archive Template
First of all, design shop pages for your desired product that you can apply to every product on the website by following these steps:
- Head on over to “Elementor,” open “My templates,” and tap on the “Add new” button.
- Select “Product archive” as a template.
- Type in the template name and click on the “Create template” button.
Step 2: Select an Elementor Template or Create Your Own.
A layout is a must if you want to customize your online shop with Elementor. You can also create a custom template through the special widgets you have in the editing panel.
It is best to choose a layout from the ones that are available and then change it to fit your website.
Step 3: Enhance your Shop with Product Widgets
Elementor has a plethora of widgets just to develop a WooCommerce website. These widgets enable you to edit each and every corner of your WooCommerce shop. The following is an exhaustive list of Elementor widgets that you can use:
- Pages for WooCommerce
- Products in the archive
- Add to Cart Customized
- Breadcrumbs for WooCommerce
- Title/description of the archive
- carts with menus
- Product classifications
- merchandise
Step 4: Alter the “Add-to-cart” button
An add-to-cart button is one of the essential features of any online shop page. All you need is to make your add-to-cart button unique and stand out so it can catch your customers’ eyes.
On the elementor interface, select the ‘custom add to cart’ button to make it streamline with your brand. With a few clicks, you will be amazed at how your button has transformed into something aesthetic and pleasing to the eyes.
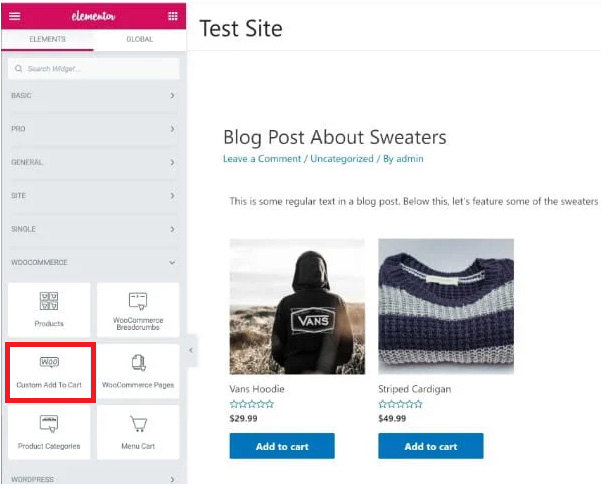
With a few clicks, you will be amazed at how your button has transformed into something aesthetic and pleasing to the eyes.
Step 5: Create the Conditions and Make Your Shop Page Public.
Once you feel satisfied with all the customization you did to your page, click the “Publish” button.
Now, you will have to set the conditions as per Elementor’s direction to determine where your template is used throughout your website.
The template, by default, will influence every product page of your WooCommerce site. Also, you can choose a particular product category. Now, click “Save and continue” to complete everything. By finalizing this step, you are done with editing the WooCommerce page shop with Elementor.
Last Word
You have seen and understood the five basic steps to edit the WooCommerce shop page with Elementor. Elementor, as a feature-full WordPress plugin, allows you to design and develop shopping pages visually to make them brand-friendly. It’s time-saving and light on the pocket, and you also don’t need expert professionals to make your WordPress site.
Gain multichannel inventory visibility and control with eChannelHub
Learn more about eChannelHub with a free demo, tailored for your unique retail business.
Request A DemoRequest a Demo
Gain multichannel inventory visibility and control with eChannelHub
Learn more about eChannelHub with a free demo, tailored for your unique online business